

Forget generic tutorials that leave you frustrated!
This guide is your personalized compass, navigating you towards eyeliner mastery regardless of your eye shape, skill level, or wildest artistic vision.
Decoding Your Eye Shape – The Key to Eyeliner Magic
Our eyes are as captivating as snowflakes, each with its unique charm. Understanding your eye shape is the key to unlocking eyeliner’s true potential. Here’s a breakdown with insider tips:
-
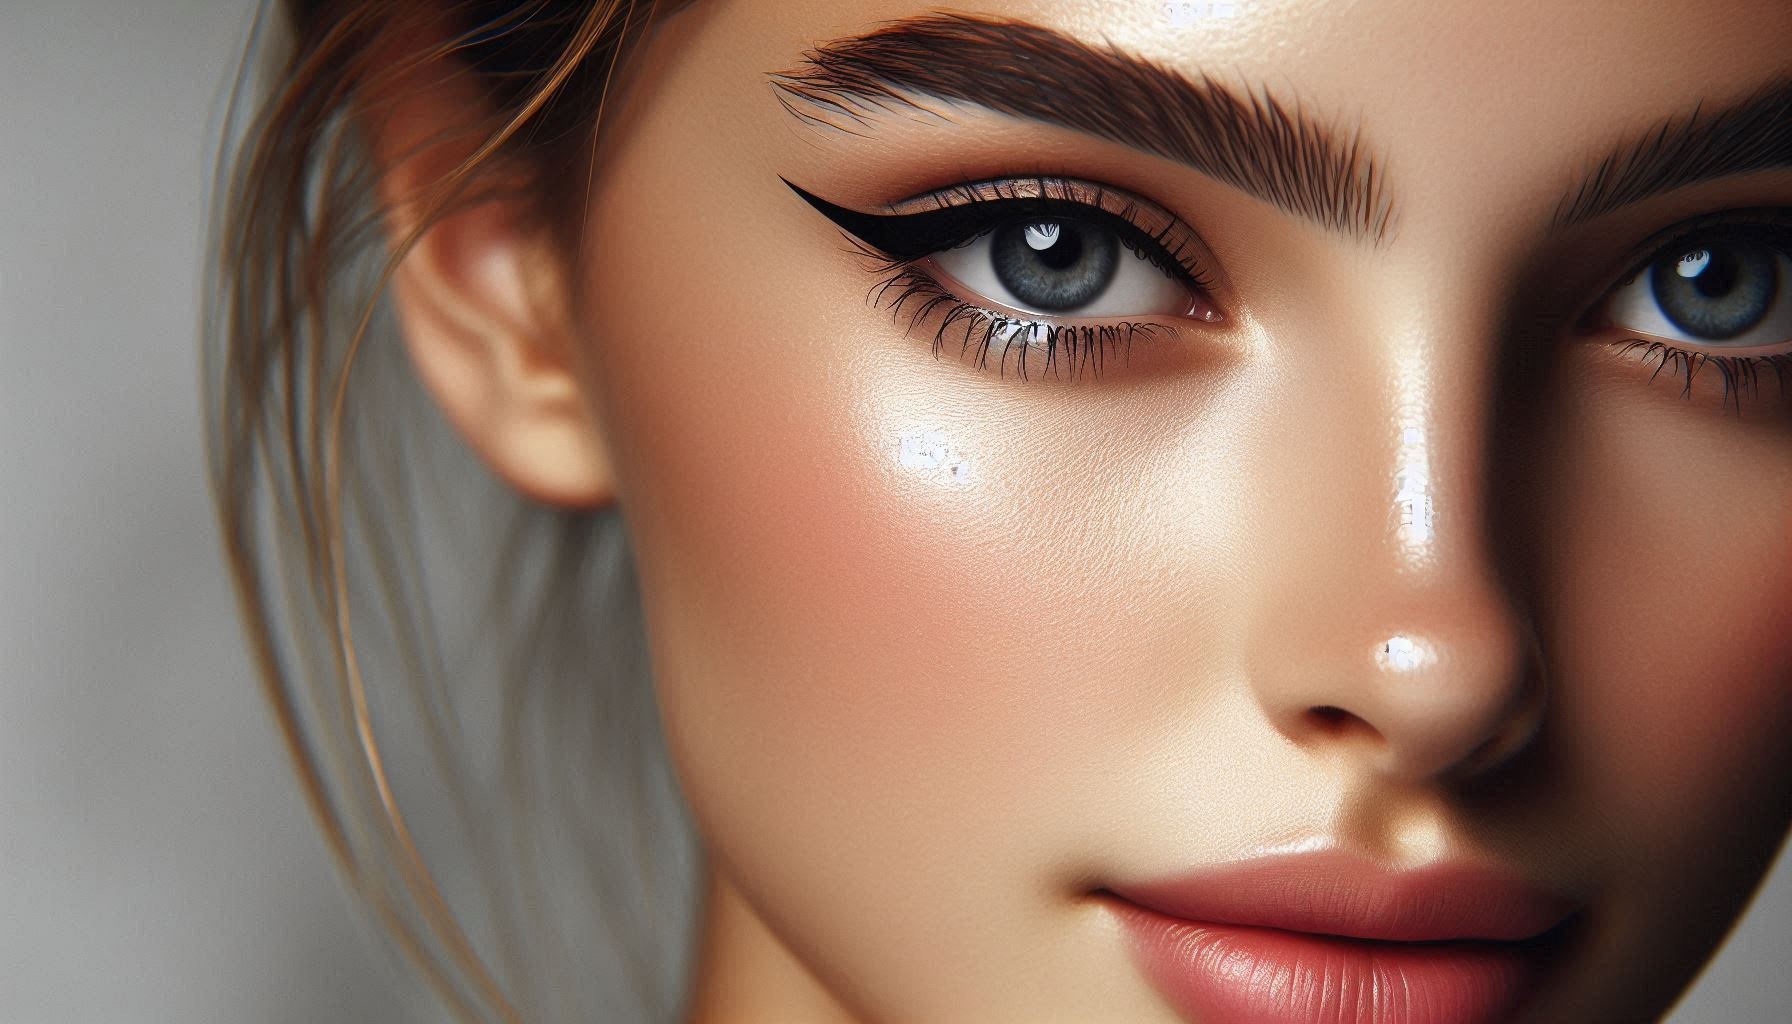
Almond Eyes: You lucky ducks have the ultimate playground! Experiment with anything from classic tightlining for subtle definition to dramatic feline flicks for a show-stopping look. Pro Tip: Play with eyeliner thickness. A thicker line towards the outer corner adds depth, while a thin line keeps things delicate. Want a smoky effect? Try smudging a gel liner with a cotton swab for a diffused, sultry vibe.
-
Hooded Eyes: Your secret weapon is a “lifted wing.” Instead of the classic upward flick, extend your line outwards following your lower lash line’s natural angle. This creates the illusion of lifted lids and lets your eyeliner artistry take centre stage. Pro Tip: Use eyeshadow to subtly define your crease before applying eyeliner. This creates a base for your liner to “sit on,” preventing it from disappearing into the hood of your eyelid. Feeling fancy? Apply a shimmery eyeshadow on your lid for a touch of glam.
-
Deep-Set Eyes: Let’s add some depth with a double whammy! Apply a defined line on your upper lash line and a touch of shimmer (think kohl pencil or a creamy shadow) on your lower waterline. This pops open your peepers and makes them sparkle. Pro Tip: Use a flesh-toned liner on your lower waterline to further brighten and widen the appearance of your eyes. Feeling bold? Experiment with a thicker line on your upper lash line, gradually thickening it towards the outer corner for a dramatic effect.
-
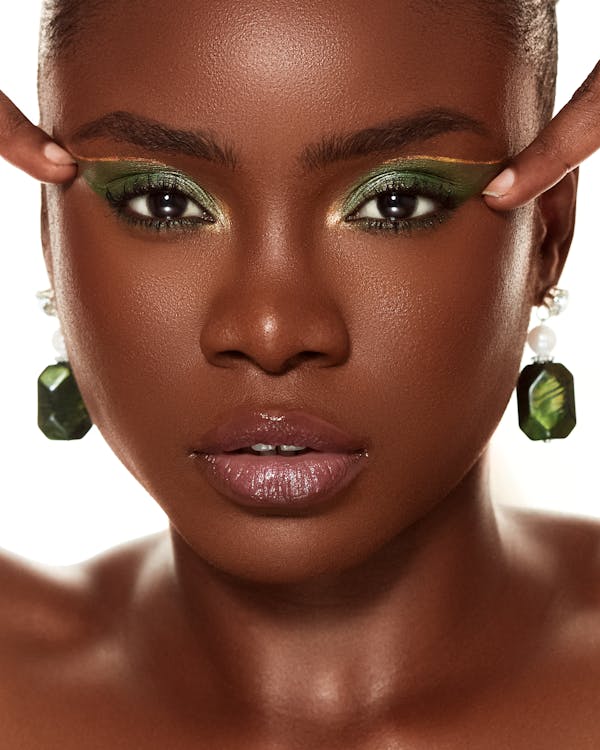
Monolid Eyes: Graphic eyeliner is your best friend! Embrace bold colours and dramatic flicks that complement your unique eye shape. Play with double wings for a statement look, or create geometric shapes like triangles or stars for a truly artistic expression. Pro Tip: Use a primer specifically designed for oily lids to ensure your eyeliner stays put all day long. Don’t be afraid to experiment with different eyeliner colours and textures.
Tips:
- Almond Eyes: Your versatile canvas allows for experimentation with various eyeliner styles. Opt for classic tightlining for subtle enhancement or dramatic cat eyes for a bold statement.
- Hooded Eyes: Enhance your eye shape with a “lifted wing” technique, following the natural angle of your lower lash line to create the illusion of lifted lids.
- Deep-Set Eyes: Add depth and sparkle to your eyes by combining a defined upper lash line with a touch of shimmer on the lower waterline.
- Monolid Eyes: Embrace graphic eyeliner looks with bold colours and geometric shapes to complement your unique eye structure.
Tricks:
- Almond Eyes: Experiment with eyeliner thickness to create different effects, from soft and natural to bold and dramatic.
- Hooded Eyes: Define the crease with eyeshadow before applying eyeliner to prevent it from disappearing into the hooded lid.
- Deep-Set Eyes: Use a flesh-toned eyeliner on the waterline to brighten and widen the eyes, and consider adding a thicker line on the upper lash line for a dramatic effect.
- Monolid Eyes: Invest in a primer for oily lids to ensure long-lasting eyeliner, and explore different textures and colours for creative expression.
Hacks:
- Almond Eyes: Blend gel liner with a cotton swab for a smudged, smoky effect without compromising on longevity.
- Hooded Eyes: Apply shimmer eyeshadow on the lid to add dimension and draw attention away from the hooded area.
- Deep-Set Eyes: Combine a defined upper lash line with a touch of shimmer on the lower waterline to make your eyes pop.
- Monolid Eyes: Use a waterproof eyeliner to prevent smudging throughout the day, and experiment with double-winged or geometric eyeliner shapes for a unique look.
Examples:
- Almond Eyes: Create a subtle winged eyeliner look for daytime using a brown gel liner.
- Hooded Eyes: Achieve a glamorous evening look by pairing a winged eyeliner with metallic eyeshadow.
- Deep-Set Eyes: Enhance your natural beauty with a soft smoky eyeliner paired with a nude lip for a classic look.
- Monolid Eyes: Make a statement with a bold, colourful eyeliner design inspired by geometric shapes.
Problem Solving:
- Common issues like smudging, uneven lines, or eyeliner transfer can be addressed by using setting powder, practicing steady application techniques, and cleaning up mistakes with makeup remover and concealer.
Step 2: Prep Like a Pro
Just like a painter needs a primed canvas, flawless eyeliner application requires prepping your eyelids.
Start by gently cleansing the area to remove any makeup, oils, or impurities that might hinder the application.
Follow this with a nourishing eye cream to hydrate and smooth the delicate under-eye area. This creates a smooth surface for your eyeliner to glide on effortlessly.
To further enhance longevity and prevent smudging, consider incorporating an eyelid primer into your routine.
A well-prepped canvas is the secret to eyeliner that lasts all day long, so don’t skip this crucial step!
Tips:
- Cleansing: Start by gently removing any makeup and impurities from the eye area to ensure a clean canvas for eyeliner application.
- Hydration: Apply a nourishing eye cream to hydrate and smooth the delicate skin around the eyes, creating a smooth surface for eyeliner application.
- Priming: Consider using an eyelid primer to enhance longevity and prevent smudging of your eyeliner throughout the day.
Tricks:
- Use micellar water or a gentle makeup remover to cleanse the eye area thoroughly without causing irritation.
- When applying eye cream, use your ring finger to pat the product gently around the eye area to avoid pulling on the delicate skin.
- Apply a small amount of primer onto the eyelids and blend it evenly with your fingertips or a makeup brush to create a smooth base for eyeliner application.
Hacks:
- To ensure long-lasting eyeliner, set your eyelids with a translucent setting powder after applying primer.
- If you’re in a hurry, you can skip the eye cream and primer steps and opt for a multitasking eye primer that hydrates and preps the eyelids simultaneously.
- For oily eyelids, choose a mattifying eyelid primer to control excess oil and prevent eyeliner from smudging or fading throughout the day.
Examples:
- Start your makeup routine by cleansing your face with a gentle cleanser, followed by removing any residual makeup around the eye area with micellar water.
- Apply a pea-sized amount of eye cream to the under-eye area using your ring finger, gently tapping it in until fully absorbed.
- Use a small amount of eyelid primer and blend it evenly across the eyelids using a makeup brush or your fingertips, focusing on areas where you’ll apply eyeliner.
Problem Solving:
- If you experience creasing or smudging of your eyeliner, try setting your eyelids with a translucent setting powder or using an eyeshadow primer specifically designed for oily eyelids to prevent makeup from slipping or fading.
Choosing Your Perfect Partner – Finding Your Ideal Eyeliner
Eyeliner comes in many forms, each with its strengths. Here’s a breakdown to help you find your ideal match:
-
The Gel Master: For smoky goddesses and smudged-out vibes, gel liners are your best bet. They offer a blendable texture that’s perfect for creating a diffused, sultry look. Pro Tip: Invest in a good quality angled eyeliner brush for ultimate control when applying and blending gel liners. Want a sharper line? Let the gel liner set for a few seconds before smudging it out for a more defined effect.
-
The Liquid Maestro: Craving razor-sharp precision and bold lines? Liquid liners are your tool of choice. However, they require a steadier hand. Practice makes perfect! Pro Tip: Start with short, thin strokes close to your lash line and gradually build them up for a thicker line. Feeling shaky? Rest your elbow on a stable surface for better control.
-
The Kohl Companion: Beginners, rejoice! Kohl pencils are your friendly companions. They’re easy to apply, blend beautifully, and offer a softer, more forgiving approach to eyeliner. Pro Tip: Keep your kohl pencil sharpened for ultimate control and precision, especially when tightlining. Want a more dramatic look? Line your upper lash line with kohl and then go over it with a liquid liner for added intensity.
Tips:
- Consider your preferred eyeliner style and desired effect when choosing between gel, liquid, or kohl pencil eyeliners.
- Experiment with different eyeliner formulas and applicators to find the one that offers the best control and precision for your desired look.
- Invest in high-quality eyeliners that are long-lasting and smudge-proof to ensure your makeup stays put throughout the day.
Tricks:
- To create a smudged, sultry look, use a gel eyeliner and blend it out with a small brush or a cotton swab for a soft, diffused effect.
- For precise, sharp lines, opt for a liquid eyeliner with a fine-tip applicator and practice drawing short, controlled strokes along the lash line.
- Kohl pencils are great for creating a smoky, smudged effect, especially when applied to the waterline or tightline.
Hacks:
- If you prefer the precision of liquid eyeliner but struggle with shaky hands, rest your elbow on a stable surface while applying to improve control and steadiness.
- To revive dried-out gel or liquid eyeliners, add a drop of eye drops or contact lens solution to the product and mix it with a clean brush until smooth and creamy again.
- If you’re short on time, opt for a double-ended eyeliner with a kohl pencil on one end and a liquid liner on the other for versatile looks with minimal effort.
Examples:
- Experiment with a gel eyeliner and an angled brush to create a soft, smudged winged liner look for a casual daytime vibe.
- Use a liquid eyeliner with a fine-tip applicator to create a precise, cat-eye flick for a glamorous evening look.
- Tightline your upper waterline with a kohl pencil to define your eyes and make your lashes appear thicker and fuller.
Problem Solving:
- If you struggle with eyeliner smudging or fading throughout the day, set your eyeliner with a matching eyeshadow or translucent setting powder to lock it in place.
- If you find liquid eyeliner application challenging, practice with short, thin strokes along the lash line and gradually build up the thickness for a more controlled result.
Prepping Your Canvas – Creating the Perfect Base
Think of your eyelid as a blank canvas. To ensure your eyeliner masterpiece stays put all day long, you need a clean and prepped base. Here’s the process:
- Cleanse Gently: Start by gently cleansing your eyelids with a makeup remover or micellar water to remove any oils or leftover makeup.
- Prime Time: Apply a thin layer of eye primer or a dab of concealer to create a smooth and even base. This helps your eyeliner glide on effortlessly and prevents smudging. Pro Tip: If you have oily lids, opt for a mattifying primer to control excess oil and keep your eyeliner looking fresh throughout the day. Feeling fancy? Apply a light eyeshadow in a neutral shade as your base for a more even application of eyeliner.
Tips:
- Start by gently cleansing your eyelids with a makeup remover or micellar water to remove any oils or leftover makeup that could affect the longevity of your eyeliner.
- Apply a thin layer of eye primer or a dab of concealer to create a smooth and even base for your eyeliner. This helps the product adhere better and prevents smudging or creasing.
- Consider using a mattifying eye primer if you have oily eyelids to control excess oil and ensure your eyeliner stays in place throughout the day.
Tricks:
- Use a light eyeshadow in a neutral shade as your base to create an even canvas for your eyeliner and enhance its colour payoff.
- For a more vibrant and long-lasting eyeliner application, set your primer or concealer with a matching eyeshadow before applying your eyeliner.
- If you have hooded or oily eyelids, apply a translucent setting powder over your primer to further mattify the surface and prevent your eyeliner from smudging or transferring.
Hacks:
- To correct any mistakes or unevenness in your eyeliner application, dip a small brush in makeup remover and carefully clean up the edges for a precise and polished look.
- If you’re in a rush, skip eyeshadow primer and use a matte, neutral eyeshadow shade as your base to create a quick and easy canvas for your eyeliner.
- For a quick touch-up throughout the day, carry a travel-sized setting spray in your purse and mist it lightly over your eyelids to refresh your makeup and prevent smudging.
Examples:
- After cleansing your eyelids, apply a pea-sized amount of eye primer and blend it evenly across your lids using your fingertips or a makeup sponge.
- Set your eye primer with a matte, neutral eyeshadow shade that matches your skin tone to create a smooth and even base for your eyeliner.
- Finish by applying your favourite eyeliner formula along your lash line, focusing on creating precise lines and sharp edges for a polished finish.
Problem Solving:
- If you struggle with oily eyelids, use an oil-absorbing blotting paper to remove excess oil before applying your eyeliner to ensure better adherence and longevity.
- If your eyeliner tends to smudge or fade throughout the day, try using a waterproof or long-wearing formula for a more durable and budge-proof finish.
Mastering the Fundamentals – Building Blocks for Creativity
by
AOG PIXELS
Before you become an eyeliner Michelangelo, let’s solidify your foundational skills. Here are three essential techniques to build
-
Tightlining (Optional): Define your eyes subtly by gently lining your upper waterline with your chosen eyeliner pencil. This creates the illusion of thicker lashes and wider-looking eyes. Pro Tip: If you have sensitive eyes, skip tightlining and focus on lining your upper lash line instead. For a more intense effect, try tightlining with a darker shade than your upper lash line liner.
-
Classic Eyeliner: This is your go-to technique for everyday wear. Start by following your upper lash line as close to the roots of your lashes as possible with a thin line. Begin from the inner corner and work your way outwards. Pro Tip: For a softer look, use a smudging brush to gently blend out the line after application. Feeling shaky? Try using the “dot-dot-dot” technique. Instead of drawing a continuous line, create a series of small dots along your lash line and then connect them with a thin line.
-
Winged Eyeliner: Ah, the classic wing! This adds drama and definition to your eyes. Here’s how to master it:
- Lash Line First: Start by applying a thin line along your upper lash line, following the natural curve of your eye.
- Wing It: Imagine extending the natural direction of your lower lash line outwards. Draw a thin line following this imaginary line, creating a small flick at the end. Keep the flick thin and angled slightly upwards for a flattering look.
- Connecting the Dots: Once you have your wing, go back and connect it to your upper lash line with a thin line. This creates a seamless transition between the wing and the rest of your eyeliner.
- Practice Makes Perfect: Don’t worry if your wings aren’t symmetrical at first. Practice makes perfect! Use a cotton swab dipped in makeup remover to clean up any mistakes before it sets. Feeling frustrated? Take a break and come back to it later with a fresh hand.
Tips:
- Tightlining Technique: Enhance your lash line subtly with the tightlining technique, using a waterproof eyeliner pencil to fill in the gaps between your lashes. This technique adds depth to your eyes without the need for heavy makeup, creating a natural yet defined look.
- Classic Eyeliner Application: Perfect the classic eyeliner application by starting with a thin line along your upper lash line, gradually building thickness towards the outer corner. Opt for neutral shades for a versatile everyday look that complements any eye colour and outfit.
- Winged Eyeliner Mastery: Achieve a flawless winged eyeliner look by following the natural curve of your lower lash line and extending the line outwards at a slight angle. Experiment with different wing lengths and angles to find the style that best suits your eye shape and personal preference.
Tricks:
- Smudge-Proof Solution: Keep your eyeliner looking fresh all day long with a smudge-proof formula that withstands heat, humidity, and oily skin. Look for long-lasting eyeliners that offer intense pigmentation and a matte finish for a professional-looking result.
- Customized Crease Definition: Define your eyelid crease with a matte eyeshadow shade that complements your skin tone, using a small blending brush to apply the colour with precision. Blend upwards and outwards for a seamless transition, creating the illusion of larger, more defined eyes.
- Highlighting Technique: Brighten and open up your eyes by applying a shimmery eyeshadow or highlighter to the inner corners and brow bone. This simple trick adds dimension to your eye makeup look, making your eyes appear larger and more awake.
Hacks:
- Quick Fix for Mistakes: Correct eyeliner mistakes with a cotton swab dipped in makeup remover, gently erasing any smudges or uneven lines. Blend out the area with a clean brush for a seamless finish, ensuring your makeup looks flawless all day long.
- Double-Ended Tools: Simplify your makeup routine with double-ended makeup tools that offer versatility and convenience. Choose a brush with a fine-tip applicator on one end for precise lines and a smudging brush on the other for softening edges and creating smoky effects.
- Multitasking Products: Make the most of your makeup collection by investing in multitasking products that serve multiple purposes. Look for eyeliners that can double as eyeshadows or brow pencils for creative makeup looks on the go.
Examples:
- Effortless Everyday Look: Achieve a natural, everyday makeup look by tightlining your upper waterline with a waterproof eyeliner pencil. Add a thin line along your upper lash line for subtle definition, finishing with a coat of mascara for fluttery lashes.
- Classic Cat Eye: Create a classic cat-eye look by drawing a thin line along your upper lash line, extending it outwards at a slight angle for a subtle flick. Keep the wing short and precise for a sophisticated finish that complements any outfit or occasion.
- Smokey Eye Sophistication: Elevate your evening makeup look with a sultry Smokey eye, starting by defining your crease with a matte eyeshadow shade. Apply a creamy eyeliner along your upper lash line, blending outwards for a soft, diffused effect, and finish with dark eyeshadows for depth and intensity.
Problem Solving:
- Eyeliner Transfer Prevention: Prevent eyeliner transfer onto the eyelid crease by setting your makeup with a translucent setting powder or neutral eyeshadow. This creates a barrier that absorbs excess oil and moisture, keeping your eyeliner in place and preventing smudging or fading throughout the day.
- Crease Definition Enhancement: Define your eyelid crease with a matte eyeshadow shade that is slightly darker than your skin tone, using a small blending brush for precision. Blend outwards for a seamless transition, creating the illusion of larger, more defined eyes.
- Brightening Technique: Brighten and lift your eyes by applying a shimmery eyeshadow or highlighter to the inner corners and brow bone. This simple trick adds dimension to your eye makeup look, making your eyes appear larger and more awake, perfect for everyday wear or special occasions.
Level Up: Unveiling Niche Techniques
Now that you’ve mastered the basics, it’s time to explore the exciting world of eyeliner styles tailored to your specific eye shape. Here are some niche techniques to take your eyeliner game to the next level:
-
Hooded Eyes: Befriend the “puppy eye” liner! This delicate wing flicks upwards at a slight angle instead of outwards. This creates a youthful and lifted look that flatters hooded eyes. Pro Tip: Use waterproof or long-wearing eyeliner formulas to ensure your liner stays put and doesn’t transfer onto your hooded lid. Want to add extra definition? Tightline your upper lash line with a kohl pencil for a subtle, smoky effect.
-
Deep-Set Eyes: Highlight your beautiful eyes with a “cat eye” liner. This classic features a thicker line towards the outer corner, creating a dramatic, elongated effect. Pro Tip: To further open up your eyes, apply a light-coloured eyeshadow (think shimmery white, cream, or champagne) to your inner tear duct area. Feeling adventurous? Experiment with a colored eyeliner in a shade that complements your eye colour for a unique pop.
-
Monolid Eyes: Embrace the graphic liner trend! Experiment with bold colours, double wings, or even geometric shapes to create a truly unique look that complements your monolids. Here are some specific ideas:
- Double Wing Eyeliner: Create a bold and dramatic look with two flicks instead of one. Start with a classic wing and then add a second, shorter wing slightly closer to the inner corner of your eye.
- Geometric Shapes: Play with shapes like triangles or stars! Use a small angled brush or a liquid eyeliner pen for ultimate precision when creating these geometric designs. For a softer look, try using a gel liner and smudging it out slightly.
Tips:
- Puppy Eye Liner for Hooded Eyes: Embrace the “puppy eye” liner technique for hooded eyes, which involves flicking the eyeliner upwards at a slight angle instead of outwards. This creates a lifted and youthful appearance, accentuating the eyes without emphasizing the hooded lid.
- Cat Eye Liner for Deep-Set Eyes: Highlight your beautiful eyes with a classic “cat eye” liner, featuring a thicker line towards the outer corner for a dramatic, elongated effect. This technique adds depth and dimension to deep-set eyes, making them appear larger and more defined.
- Graphic Liner for Monolid Eyes: Explore the graphic liner trend with bold colours, double wings, or geometric shapes that complement your unique monolid eye shape. Experiment with different eyeliner styles to express your creativity and individuality.
Tricks:
- Waterproof Formulas for Oily Lids: Opt for waterproof or long-wearing eyeliner formulas to ensure your makeup stays put and doesn’t transfer onto oily lids. Look for smudge-proof options that offer intense pigmentation and a matte finish for a polished look that lasts all day.
- Precision Application with Angled Brush: Achieve precise application with an angled eyeliner brush, which offers ultimate control and precision for creating sharp lines and intricate designs. Use short, controlled strokes to build up the intensity and thickness of your eyeliner for a customized look.
- Colourful Accents for Expressive Looks: Add a pop of colour to your eyeliner look with vibrant shades that complement your eye colour and skin tone. Experiment with jewel tones, pastels, or neon hues for a playful and expressive makeup look that reflects your personality.
Hacks:
- Tightlining for Fuller Lashes: Define your eyes and create the illusion of fuller lashes by tightlining your upper waterline with a waterproof eyeliner pencil. This technique adds volume and depth to your lash line, making your eyes appear bigger and more awake.
- Colourful Waterline for Subtle Impact: Brighten and enhance your eyes by lining your lower waterline with a coloured eyeliner pencil. Choose shades that complement your eye colour for a subtle yet impactful look that adds dimension and interest to your makeup.
- Layering Techniques for Dimension: Layer different eyeliner formulas and textures to add dimension and depth to your eye makeup look. Start with a creamy kohl pencil as a base, then layer liquid or gel eyeliner on top for intensified colour and longevity.
Examples:
- Soft Puppy Eye Liner Look: Create a soft and subtle puppy eye liner look for hooded eyes by flicking the eyeliner upwards at a slight angle. Use a waterproof eyeliner pencil to line the upper lash line and extend the line outwards, finishing with a coat of mascara for added definition.
- Dramatic Cat Eye Liner Style: Make a statement with a dramatic cat eye liner style for deep-set eyes, featuring a thick line towards the outer corner and a sharp winged flick. Use a liquid eyeliner with a fine-tip applicator for precision and control, and pair with bold eyeshadows for added impact.
- Colourful Graphic Liner Design: Experiment with a colourful graphic liner design for monolid eyes, featuring geometric shapes or double wings in vibrant shades. Use a combination of pencil, liquid, and gel eyeliners to create bold and artistic looks that showcase your creativity.
Problem Solving:
- Eyeliner Smudging Prevention: Prevent eyeliner smudging and fading throughout the day by setting your makeup with a translucent setting powder or eyeshadow. This helps absorb excess oil and moisture, keeping your eyeliner in place and ensuring long-lasting wear.
- Eyeliner Transfer Minimization: Minimize eyeliner transfer onto the eyelid crease by applying a thin layer of eyeshadow primer or concealer to create a smooth and even base. This creates a barrier that prevents the eyeliner from smudging or migrating throughout the day.
- Precision Application Tips: Improve precision and control during eyeliner application by resting your elbow on a stable surface and using short, controlled strokes. Practice different techniques and experiment with various eyeliner formulas to find the method that works best for you.
Beyond the Basics
Eyeliner is your artistic playground! Don’t be afraid to experiment with colours, textures, and finishes. Here are some inspiration sparks to ignite your creativity:
-
Glitter Eyeliner: Add a touch of sparkle for a festive or glamorous look. Apply a glitter liner on top of your regular eyeliner for a subtle shimmer, or use it alone for a bolder statement.
-
Coloured Eyeliner: Play with jewel tones, pastels, or even neon for a truly unique statement. Pro Tip: If you’re new to coloured eyeliner, start with a thin line or a small accent at the outer corner of your eye to ease into the look. Feeling bold? Line your lower waterline with a coloured kohl pencil for an extra pop of colour.
-
Double-Ended Tools: These handy tools come with a kohl pencil on one end and a liquid liner on the other, offering versatility for creating both soft and defined looks. Pro Tip: Use the kohl pencil to create a smoky base and then go over it with the liquid liner for a sharp, defined wing.
Tips:
- Glitter Eyeliner for Festive Looks: Add a touch of sparkle to your makeup with glitter eyeliner, perfect for festive occasions or glamorous evening looks. Apply a glitter liner over your regular eyeliner for a subtle shimmer, or use it alone for a bold statement that catches the light.
- Coloured Eyeliner for Unique Statements: Experiment with coloured eyeliner in jewel tones, pastels, or neon shades for a unique and expressive makeup look. Start with a thin line or small accent at the outer corner of your eye to ease into the trend, then gradually build up to bolder looks as you feel more confident.
- Double-Ended Tools for Versatility: Invest in double-ended eyeliner tools that feature a kohl pencil on one end and a liquid liner on the other. This versatile option allows you to create both soft, smudged looks and sharp, defined lines with ease.
Tricks:
- Layering for Dimension: Layer different eyeliner colours and textures to add dimension and depth to your eye makeup. Start with a base of creamy kohl pencil, then layer liquid or gel eyeliner on top for intensified colour and longevity. Experiment with different combinations to find your signature look.
- Gradual Build-Up for Intensity: Build up the intensity of your eyeliner gradually by starting with thin, light strokes and gradually adding more layers for a bolder effect. This technique allows you to control the thickness and intensity of your eyeliner, creating a customized look that suits your preferences.
- Precision Application with Tape: Achieve sharp, clean lines with precision application by using tape as a guide. Place a small piece of tape at the outer corner of your eye, following the angle of your lower lash line, then apply your eyeliner along the edge of the tape for a flawless winged look.
Hacks:
- Quick Fix with Cotton Swab: Fix eyeliner mistakes quickly and easily with a cotton swab dipped in makeup remover. Use the cotton swab to gently erase any smudges or uneven lines, then follow up with a clean brush or fingertip to blend and smooth the area for a seamless finish.
- Customized Colour Creation: Create your own custom eyeliner colours by mixing different shades and textures together. Use a clean surface, such as the back of your hand or a makeup palette, to blend and combine eyeliners until you achieve the perfect hue for your look.
- Layering for Longevity: Extend the wear time of your eyeliner by layering it over a matching eyeshadow or setting it with a translucent setting powder. This helps lock the eyeliner in place and prevents it from smudging or fading throughout the day.
Examples:
- Glittery Winged Liner Look: Elevate your winged liner look with a touch of glitter eyeliner along the upper lash line. Start by creating a classic winged shape using liquid eyeliner, then add a thin line of glitter liner on top for a festive finish that sparkles in the light.
- Bold Coloured Liner Style: Make a statement with bold coloured eyeliner in vibrant shades like electric blue or emerald green. Experiment with different shapes and styles, such as double wings or graphic shapes, to showcase your creativity and individuality.
- Dual-Ended Tool Mastery: Master the art of dual-ended eyeliner tools by using the kohl pencil end to create a smudged, smoky look along the lower lash line, then switching to the liquid liner end to add sharp definition to the upper lash line. This versatile tool allows you to create a variety of looks with ease.
Problem Solving:
- Glitter Clean-up: Remove glitter eyeliner fallout with ease by using a piece of sticky tape or a clean adhesive strip. Gently press the tape onto the affected area and lift away to remove any stray glitter particles without disturbing the rest of your makeup.
- Colour Correction: Correct any mistakes or uneven lines by using a small brush dipped in makeup remover to erase and clean up the area. Follow up with a dab of concealer or foundation to even out the skin tone and create a smooth canvas for your makeup.
- Setting Powder for Longevity: Set your eyeliner in place for long-lasting wear by dusting a translucent setting powder over the top. Use a small, fluffy brush to apply the powder lightly and evenly, focusing on areas where smudging or fading is most likely to occur.
Embrace the Journey: It’s All About You!
Remember, makeup is all about having fun and expressing yourself! Don’t get discouraged if your first winged liner isn’t symmetrical. We’ve all been there. Here are some additional hacks and tricks to keep in mind:
- Set Your Eyeliner: Once you’ve applied your eyeliner, dust a translucent setting powder over your eyelids to help prevent smudging and ensure your eyeliner stays put all day long.
- Sharpen Your Tools: Keep your kohl pencils and angled eyeliner brushes sharp for the most precise application. A dull pencil or brush can lead to a less defined look.
- The Spoon Trick: This is a fun trick for beginners struggling with winged eyeliner! Place a spoon on the outer corner of your eye, angled towards your temple. Use the spoon’s handle as a guide to draw your wing, ensuring a straight and even line.
- Clean Up Mistakes with Concealer: Made a mistake? Don’t fret! Use a cotton swab dipped in makeup remover to gently clean up the error. Then, use a concealer that matches your skin tone to cover the mistake and create a clean canvas.
Bonus Tip: Feeling overwhelmed by all the options? Start with a simple look you feel comfortable with and gradually build your confidence and skill level. There are endless eyeliner tutorials online, so find one that resonates with your style and eye shape. Most importantly, have fun and let your creativity shine through!
Eyeliner Mishaps: Don’t Sweat It!
Even the pros make mistakes! Here’s how to fix some common eyeliner mishaps:
- Winged Eyeliner Gone Wrong: Did your wings end up uneven? No worries! Dip a cotton swab in makeup remover and gently clean up the mistake. Then, use your chosen eyeliner to redraw the wing on the smaller side.
- Smudged Liner: Don’t fret! Use a cotton swab dipped in makeup remover to clean up the smudge. Apply a setting powder to prevent further smudging, then carefully reapply your eyeliner.
- Too Thick Eyeliner: Feeling like you went overboard? Grab a cotton swab dipped in makeup remover and carefully remove the excess liner. You can then reapply a thinner line for a more delicate look.
Tips:
- Have Fun and Experiment: Makeup is an art form, so don’t be afraid to have fun and experiment with different eyeliner techniques, colours, and styles. Use your creativity to express yourself and discover new looks that make you feel confident and empowered.
- Start Simple and Build Confidence: If you’re new to eyeliner, start with simple, beginner-friendly techniques like tightlining or basic winged liner. As you gain confidence and skill, gradually challenge yourself with more advanced techniques and styles.
- Find Inspiration Everywhere: Draw inspiration from various sources, including makeup tutorials, fashion magazines, social media influencers, and everyday life. Pay attention to different eyeliner looks you admire and use them as inspiration for your own makeup creations.
Tricks:
- Practice Regularly: Like any skill, mastering eyeliner requires practice and patience. Set aside time each day to practice different techniques and experiment with new looks. The more you practice, the more comfortable and confident you’ll become with eyeliner application.
- Watch Tutorials for Guidance: Take advantage of online makeup tutorials and demonstrations to learn new eyeliner techniques and tips from experienced makeup artists. Follow along with step-by-step instructions and visual demonstrations to refine your skills and expand your repertoire.
- Take Note of Your Progress: Keep track of your eyeliner journey by documenting your progress with photos or written notes. Celebrate your achievements and milestones along the way, whether it’s mastering a new technique or perfecting your signature eyeliner style.
Hacks:
- Customize Your Tools: Customize your eyeliner tools to suit your preferences and needs. Trim the bristles of your eyeliner brush for greater precision, or invest in specialized tools like stamp eyeliners or stencils to simplify application and achieve consistent results.
- Use Tape for Clean Lines: Create crisp, clean lines with the help of adhesive tape or sticky notes. Place the tape along the outer edge of your eye at the desired angle for your winged liner, then apply your eyeliner along the edge of the tape for a sharp, precise line. Remove the tape carefully to reveal flawless results.
- Experiment with Textures and Finishes: Explore different eyeliner textures and finishes, such as matte, metallic, or shimmer, to add depth and dimension to your eye makeup. Mix and match textures to create dynamic looks that stand out and complement your overall style.
Examples:
- Progressive Winged Liner Look: Start with a basic winged liner and gradually build upon it with additional layers and details, such as double wings, graphic shapes, or intricate designs. Use different eyeliner colours and textures to create depth and visual interest for a statement-making look.
- Transformational Makeup Tutorial: Document your eyeliner journey with a transformational makeup tutorial that showcases your progress and evolution over time. Share your tips, tricks, and favourite techniques with your audience to inspire others on their own makeup journeys.
- Personalized Makeup Challenge: Challenge yourself to create a series of personalized makeup looks using eyeliner as the focal point. Experiment with different styles, colours, and techniques to express your unique personality and creativity through makeup artistry.
Problem Solving:
- Overcoming Frustration: If you encounter challenges or setbacks during your eyeliner journey, don’t get discouraged. Take a break, regroup, and approach the problem with a fresh perspective. Remember that mistakes are part of the learning process and an opportunity to grow and improve.
- Seeking Feedback and Support: Don’t hesitate to seek feedback and support from friends, family, or online communities. Share your work-in-progress photos or ask for advice and guidance from fellow makeup enthusiasts who can offer constructive criticism and encouragement.
- Celebrating Achievements: Celebrate your achievements and milestones along the way, no matter how small. Whether it’s mastering a new technique, receiving compliments on your makeup, or feeling more confident in your skills, take time to acknowledge and celebrate your progress.
Remember: Practice makes perfect! The more you experiment with eyeliner, the more comfortable and confident you’ll become. Don’t be afraid to try new things and find what works best for you. With a little practice. Keep practicing, and you’ll be a pro in no time!
You’ll Also Love:
Best Foundation for Mature Skin: 5 Formulas That Don’t Settle Into Fine Lines
How to Do Winged Eyeliner: The Foolproof Method That Works on Every Eye Shape
I Turned 43 and My Makeup Stopped Working: The 5 Products That Finally Restored My Glow
How to Contour for Your Face Shape (2026 Guide)